
Check the instructions below to view different ways to set interface settings for various PIN Pads. Be sure to check back as we add support for new PIN Pads.
PAX devices
From idle/welcome screen:
1 Touch the corners of the device screen in the following order.
- Upper Left
- Upper Right
- Lower Left
- Lower Right

When a touch is recognized the device will beep.
2 Enter the password "pax12345". Press the green check mark on the keyboard. Press Enter.

3 Select "Host/ECR Communication" from the Setup menu.

4 Check/uncheck the interfaces you want to connect with. Press "SAVE".

Ingenico AXIUM
- DX4000
- DX8000
- EX6000
- EX8000
- RX5000
- RX7000
1 From the Welcome screen, swipe up from the bottom of the screen. Press the back arrow and enter 350000 to get to the Android Home Screen.

2 Open the “ARC Comm Config” application from the Android Home Screen.

3 Select “Connection Configuration”.

4 Select “primary” configuration.

5Set the configuration to match Datacap product requirements.
Use the “USB” comm setting for NETePay (dsiEMVUS and dsiPDCX) as well as the Datacap Loader. Both configurations need to communicate with the ARC service (select “USB” and “DEFAULT” from the “Connector” dropdown). To change these values, press the down arrow button.


DC Direct and dsiEMVAndroid require an IP configuration to communicate with the ARC service. To achieve this, select “TCP_IP_SERVER” from the “Type” dropdown. Then, under the “Remove Server” section, set “IP address” to be “0.0.0.0” and “port” to be “12001”. Finally, ensure the “Mode” dropdown under the “SSL” section is set to “None”.


6Tap the "Save" button > Back arrow button > Logout button. Tap Apply. Reboot the device.


Verifone
Serial
1 Press 1+5+9 simultaneously to enter the settings menu.
2 Select "Control Panel" (scroll down if needed by dragging your finger upward).
3 Select "Sysmode"
4 Select "Supervisor"
5 Type the Supervisor password and press the green enter key. Passwords can vary
- “1111111” (First Data devices)
- “1166832” (most production devices)
- “1673491” (Chase Canada)
- “1668321” (most dev devices)
- “1686321”
6 Select "Administration".
7 Select "Config Editor" .
8 Select "config.usr1" .
Note: If the “sabaud” and “sacom” settings display above the bar that says “[reg]”, you will likely need to modify them using steps 9-16 below.
9 Select “sacom” by touching its current value.
10 Select "Modify".
11 Type "COM1" (To cycle through lowercase, uppercase, and numbers press the “#” key). For the M400, type "COM5".
12 Press the green enter key.
13 Select “sabaud” by touching its current value.
14 Select "Modify".
15 Type "115200" (To cycle through lowercase, uppercase, and numbers press the “#” key).
16 Press the green enter key.
17 Press the red cancel key 3 times to reach the main menu.
18 Select "Exit" .
19 Select "Reboot" .
USB
1 Press 1+5+9 simultaneously to enter the settings menu.
2 Select "Control Panel" (scroll down if needed by dragging your finger upward).
3 Select "Sysmode"
4 Select "Supervisor"
5 Type the Supervisor password and press the green enter key. Passwords can vary
- “1111111” (First Data devices)
- “1166832” (most production devices)
- “1668321” (most dev devices)
- “1686321”
6 Select "Administration".
7 Select "Config Editor" .
8 Select "config.usr1" .
9 Select “sacom” by touching its current value.
10 Select "Modify".
11 Type "USBD" (To cycle through lowercase, uppercase, and numbers press the “#” key).
12 Press the green enter key.
13 Press the red cancel key 3 times to reach the main menu.
14 Select "Exit" .
15 Select "Reboot" .
1 Access the “Admin Menu” by pressing 0-0-0-1 from the Welcome/Offline form.

2 Select "Communication Type".
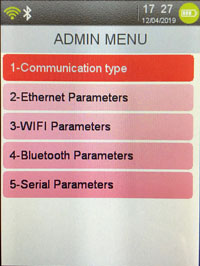
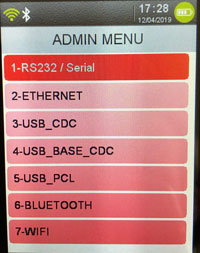
3 Change the interface.
4 Press "Cancel" key once.
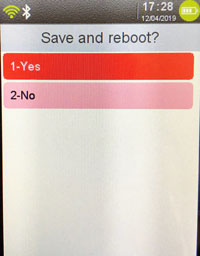
5 When prompted to save and reboot select “Yes”.
Verifone VX 805
XPI 8.42b/8.43c
1 Check what interface is set on the VX 805 by pressing the “alpha” and ‘8” keys when the VX 805 displays “welcome” on the idle screen.
2 If it is determined that the VX 805 is set for the wrong interface, you can change it by pressing the “alpha and the 8 key” when the XPI version is displayed during the boot cycle.
3 Once the screen changes to a new menu, select the correct interface by pressing the corresponding function key.
XPI 12.05.13
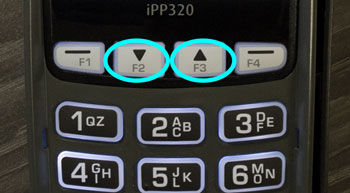
1 Press F2 and F4 to enter system mode.
2 Enter the password (1, ALPHA, ALPHA, 6, 6, 8, 3, 1) and then hit “Enter”. The Alpha key is the black key located directly above the 2 key. Enter is the Green key.
3 Press 2 for “Edit Parameters”.
4 Select “1” for “Group ID” and hit “Enter” followed by the password (1, ALPHA, ALPHA, 6, 6, 8, 3, 1). Press “Enter”.
5 Select “CONFIG.SYS” then hit “Enter”.
6 Search for Parameter: “SACOM” = COM1 or USB if connected USB.
If incorrect select “3” to edit. To change values, press the “clear” button (yellow key), and then enter USB or COM1 (to change to “alpha” select number then alpha key until correct letter is displayed) then press “Enter”.
7 Search for Parameter: “SABAUD” = 9600 or USB if connected USB.
8 Press “cancel” key (Red button).
9 Press “1” to restart VX 805.
XPI 12.11.35
1 Press F2 and F4 to enter system mode.
2 Enter the password (1, 6, 6, 8, 3, 1) and then hit “Enter”.
3 Press 2 for “Edit Parameters”.
4 Select “1” for “Group ID” and hit “Enter” followed by the password (1, 6, 6, 8, 3, 1). Press “Enter”.
5 Select “CONFIG.SYS” then hit “Enter”.
6 Search for Parameter: “SACOM” = COM1 or USB if connected USB.
7 If incorrect select “3” to edit.
To change values, press the “clear” button (yellow key), and then enter USB or COM1 (to change to “alpha” select number then alpha key until correct letter is displayed) then press “Enter”.
8 Search for Parameter: “SABAUD” = 9600 or USB if connected USB.
9 Press “cancel” key (Red button).
10 Press “1” to restart VX 805.
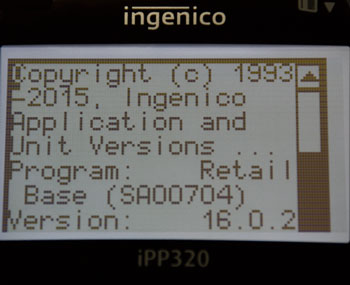
Ingenico iPP 320/350
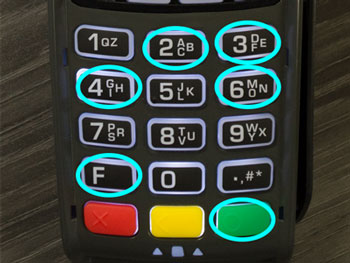
1 Once the iPP 320/iPP 350 loads the “splash” screen (see screenshot below), quickly press 2-6-3-4, the green enter key, followed by the “F” key.
2 Use the “F2/F3” keys to scroll down and select “TDA”. Press the green enter key. Select “configuration” and press the enter key, “communication” and press the enter key, and “select comm. type” and press the enter key.
3 Choose your desired interface and press the green enter key. Press the red cancel key three times. Press the “1” key (yes) at the “save and reboot” screen. The iPP320/iPP350 will then reboot with your saved settings.
Ingenico iWL 258
1 Turn on the Ingenico iWL 258 by holding the green key (enter key) in the bottom right-hand corner. Press the “F” key in the bottom left 4 times.
2 Press the”F2″ key to change the interface. Confirm your selection by pressing the enter key.
3 Press “F1” key to save. The iWL258 will then reboot with your saved settings.

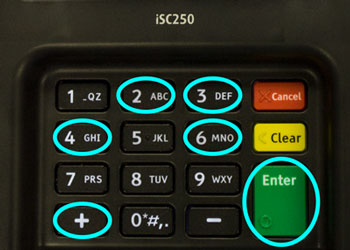
Ingenico iSC Touch 250/ iSC Touch 480
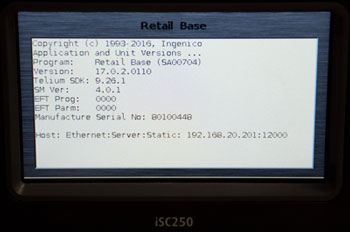
1 Once the iSC250 loads the “splash” screen, quickly press 2-6-3-4, enter key, followed by the “+” key.
2 Use the included stylus to scroll down and select “TDA”. For the remaining steps, you’ll need to use the +/- keys to scroll up and down.
3 Select “configuration” and press the enter key, “communication” and press the enter key, and “select comm. type” and press the enter key.
4 Choose your desired interface method and press the green enter key.
Equinox L5200/5300
1 Power up the PIN pad by connecting device to power source and wait for the “FPE” screen (“FPE” will show on display in the top center of screen).
2 Press the red “X” button on the key pad to enter the Main Menu.
*** For steps 3-7, use the touchscreen to make selections ***
3 Enter the password “MULTILANE” using the on-screen keyboard followed by “enter”.
4 Select “Setup” followed by “ECR Port”.
5 Choose your desired interface setting.
6 Select “Apply Now” to make the change take effect.
7 Press “Exit” on the bottom right portion of the screen until the PIN pad restarts.